Saturday, January 28, 2017

WordPress - Permalink Setting

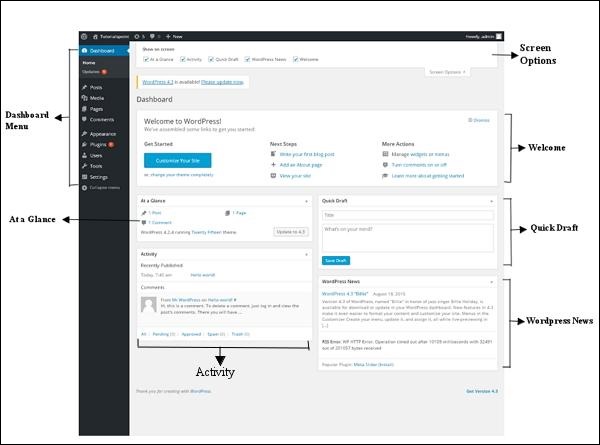
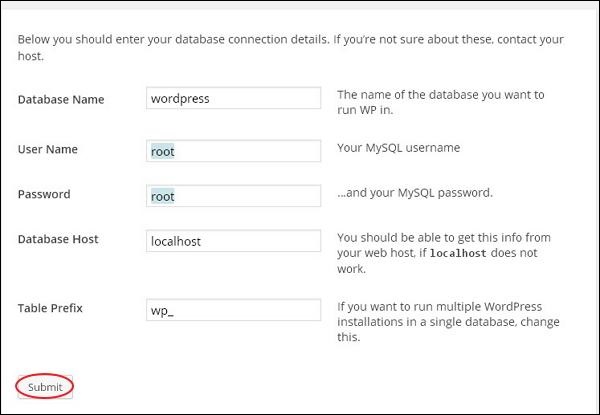
In this chapter, we will learn about Permalink settings in WordPress. Permalink is a permanent link to a particular blog post or category. It allows setting the default permalink structure. These settings are used to add permalinks to your posts in WordPress. Following are the steps to access permalink settings.
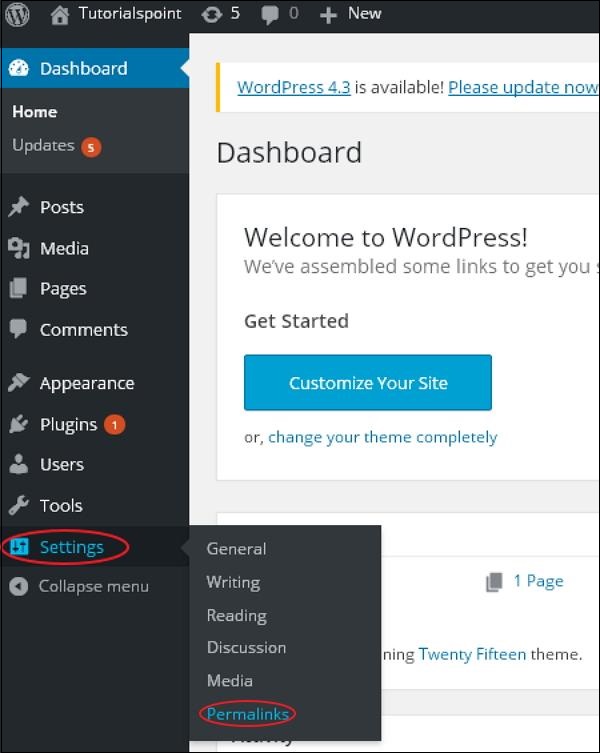
Step (1) − Click on Settings → Permalinks option from the left navigation menu.
Wordpress Permalink Settings
Step (2) − When you click on Permalinks, the following page appears on the screen.
Wordpress Permalink Settings
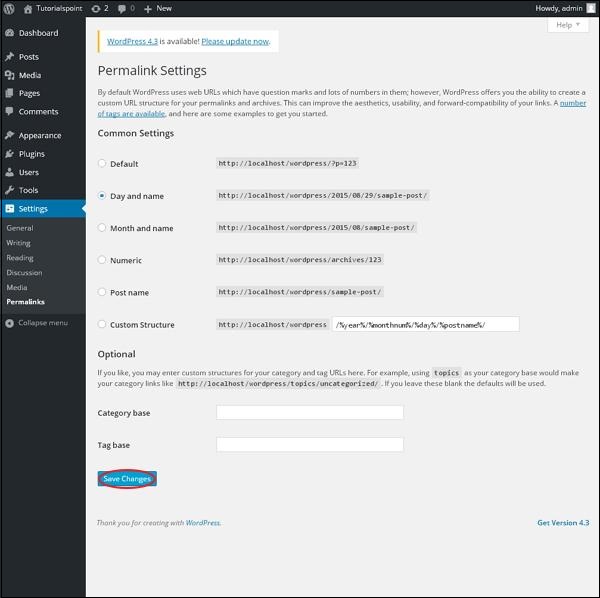
Here are a few settings you can make −
  • Common settings −
    Check any of the radio buttons to choose your permalink structure for your blogs
    • Default − It sets the default URL structure in Wordpress.
    • Day and name − It sets URL structure according to the date and name in your posts.
    • Month and name − It sets the URL structure according to the month and name in your post.
    • Numeric − It sets numbers in the URL structure in your post.
    • Post name − It sets post name in the URL structure in your post.
    • Custom Structure − It sets the URL structure of your choice by writing the desired name in the given text box.
  • Optional
    These are optional. You can add custom structure for main category or tag URL. If your text box is empty then default settings is used. Here you have two options.
    • Category Base − Add custom prefix for your category URL.
    • Tag Base − Add custom prefix to your Tags URL.
Step (3) − Once you are done with changes, click on Save Changes button to save the permalink settings.

WordPress - Media Setting

In this chapter, we will study about Media Settings in WordPress. It is used to set the height and width of the images which you're going to use on your website.
Step (1) − Click on Settings → Media option in WordPress.
Wordpress Media Setting
Step (2) − The Media Settings page is displayed as seen in the following screenshot.
Wordpress Media Setting
Following are the details of the fields on Media settings −
  • Thumbnail size − Set the size of the thumbnail.
  • Medium size − Set the height and width of medium size images.
  • Large size − Set width and height of larger images.
  • Uploading files − After checking this checkbox, the uploaded image will be arranged into year and month based folder.
Step (3) − After setting the dimension in pixels, click on Save Changes button. It saves your media setting information.

WordPress - Discussion Setting

In this chapter, we will study about Discussion settings in WordPress. WordPress discussion setting can be defined as the interaction between the blogger and the visitors. These settings are done by the admin to have a control over the posts/pages that come in through users.
Following are the steps to access the Discussion setting −
Step (1) − Click on Settings → Discussion option in WordPress.
WordPress Discussion Setting
Step (2) − The Discussion Settings page is displayed as shown in the following snapshot.
WordPress Discussion Setting
Following fields are seen in Discussion settings.
  • Default article settings − These settings are default to the new pages you create or new posts. This contains three more settings. They are −
    • Attempt to notify any blogs linked to from the article − When you publish articles then it sends a notification (sends pings and trackback) to other blogs.
    • Allow link notifications from other blogs (pingbacks and trackbacks) − Accepts pings from other blogs.
    • Allow people to post comments on new articles − You can allow or disallow other people to comment on your article using this setting.
    You can change the settings as per your will for individual articles.
  • Other Comment Settings − This setting has the following options −
    • Comment author must fill out name and e-mail − When you check this box, it is mandatory for visitors to fill their name and email address.
    • Users must be registered and logged in to comment − If you check this box, only those registered visitors can leave comments, if not checked anyone can leave any number of comments.
    • Automatically close comments on articles older than days − This option allows you to accept comments only for a particular time period as per your wish.
    • Enable threaded (nested) comments − When you check this option, visitors can reply or have a discussion and get responses.
    • Break comments into pages with top level comments per page and the page displayed by default − If your pages are getting a lot of comments then you can split them into different pages by checking this box.
    • Comments should be displayed with the comments at the top of each page − You can arrange the comments in the form of ascending or descending order.
  • Email me whenever − This setting contains two options, namely −
    • Anyone posts a comment − When you check into this box, the author gets an e-mail for every single comment that is posted.
    • A comment is held for moderation − This is used in case you do not want your comment to be updated before it's moderated by the admin.
  • Before a comment appears − This setting allows how your posts are controlled. There are two more settings as followed −
    • Comment must be manually approved − If you check this box then only the approved comments by the admin can be displayed on the posts or pages.
    • Comment author must have a previously approved comment − This can be checked when you want to approve a comment of an author whose has commented and his e-mail address matches the e-mail address of the previous posted comment. Otherwise the comment is held for moderation.
  • Comment Moderation − Contain only a specific number of links that are allowed into a comment.
  • Comment Blacklist − You can input your own spam words which you do not want your visitors to enter into the comments, URL, e-mail etc.; later it would filter the comments.
  • Avatars − Avatar is a small image that displays at the top-right-hand corner of the dashboard screen beside your name. It is like your profile picture. Here you have a few more options where you can set your avatar for WordPress site.
    • Avatar Display − It displays your avatar besides your name when it is checked.
    • Maximum rating − You have a four other options of avatars you can use. They are G, PG, R and X. This is the age section where you select according to which type of audience you want to display your posts.
    • Default Avatar − In this option, there are few more types of avatars with images; you can keep these avatars according to your visitors e-mail address.
Step (3) − Click on Save Changes button to save the changes.

WordPress - Reading Setting

In this chapter, we will study about Reading Settings in WordPress. Reading Setting is used to set the content related to the front page. You can set the number of post to be displayed on the main page.
Following are the steps to access the reading settings −
Step (1) − Click on Settings → Reading option in WordPress.
WordPress Reading Setting
Step(2) − The Reading Settings page is displayed as shown in the following screen.
WordPress Reading Setting
Following are the details of the fields on reading settings.
  • Front page displays − This section is used to display the front page in any of the following format −
    • Your latest posts − It displays latest posts on the front page.
    • A static page − It displays the static pages on the front page.
    • Front Page − You can select the actual page you want to display on front page from the drop down.
    • Posts Page − You can select the page from the drop down which contains posts.
  • Blog pages show at most − The number of posts to be displayed per page or site. By default, it is set as 10.
  • Syndication feeds show the most recent − The user can view the number of posts when they download one of the site feeds. By default, it is set as 10.
  • For each article in a feed, show − This section is used to display the post by selecting any of the following formats −
    • Full Text − It displays the complete post. It is set as default.
    • Summary − It displays the summary of the post.
  • Search Engine Visibility − After clicking on the checkbox, Discourage search engines from indexing this site, your site will be ignored by the search engine.
Step(3) − After filling all the information, click on Save Changes button to save your Reading Setting information.

WordPress writing

The writing settings controls the writing experience and provides options for customizing WordPress site. These settings control the features in the adding and editing posts, Pages, and Post Types, as well as the optional functions like Remote Publishing, Post via e-mail, and Update Services.
Following are the steps to access the writing settings −
Step (1) − To change writing settings, go to Settings → Writing option.
WordPress Writing Setting
Step (2) − The Writing Setting page is displayed as shown in the following screen.
WordPress Writing Setting
Following are the details of the fields on the page.
  • Formatting − This field defines two sub options for better user experience.
    • The first option Convert emoticons like :-) and :-P to graphics on display will turn text-based emoticons into graphic-based emoticons.
    • The second option WordPress should correct invalidly nested XHTML automatically corrects the invalid XHTML placed within the posts or pages.
  • Default Post Category − It is a category to be applied to a post and you can leave it as Uncategorized.
  • Default Post Format − It is used by themes to select post format to be applied to a post or create different styles for different types of posts.
  • Post via e-mail − This option uses e-mail address to create posts and publishes posts on your blog through e-mail. To use this, you'll need to set up a secret e-mail account with a POP3 access, and any mail received at this address will be posted.
  • Mail Server − It allows reading the e-mails that you send to WordPress and stores them for retrieval. For this, you need to have POP3 compatible mail server and it will have URI address such as mail.example.com, which you should enter here.
  • Login Name − To create posts, WordPress will need its own e-mail account. The Login Name will use this e-mail address and should be kept as a secret as spammers will post links redirecting to their own websites.
  • Password − Set password for the above e-mail address.
  • Default Mail Category − It allows selecting custom category for all the posts that are published via Post by e-mail feature.
  • Update Services − When you publish a new post, WordPress will automatically notify the site update services in the box. See the Update Services on the codex for the long list of possible services.
Step (3) − After filling all the above information, click on Save Changes button to save your information.

WordPress - General Setting

In this chapter, we will study about General Settings in WordPress. WordPress general setting is used to set the basic configuration settings for your site. In the setting administration screen, it is a default setting screen.
Following are the steps to access the general settings −
Step 1 − Click on Settings → General option in WordPress.
WordPress General Setting
Step 2 − The General Setting page is displayed as shown in the following snapshot.
WordPress General Setting
Following are the details of the fields on general settings page.
  • Site Title − It displays the name of the site in the template header.
  • Tagline − Displays a short sentence about your site.
  • WordPress Address (URL) − It is the URL of WordPress directory where your all core application files are present.
  • Site Address(URL) − Enter the site URL which you want your site to display on the browser.
  • E-mail Address − Enter your e-mail address which helps to recover your password or any update.
  • Membership − Anyone can register an account on your site after you check this checkbox.
  • New User Default Role − The default role is set for the newly registered user or members.
  • Timezone − Sets the time zone based on the particular city.
  • Date Format − Sets the date format as you need to display on the site.
  • Time Format − Sets the time format as you need to display on the site.
  • Week Starts On − Select the week day which you prefer to start for WordPress calendar. By default it is set as Monday.
  • Site Language − Sets the language for the WordPress dashboard.
Step3 − After filling all the information about general settings, click on Save Changes button. It saves all your general setting information.

WordPress Dashboard

The WordPress Dashboard is a first screen which will be seen when you log into the administration area of your blog which will display the overview of the website. It is a collection of gadgets that provide information and provide an overview of what's happening with your blog. You can customize your needs by using some quick links such as writing quick draft, replying to latest comment, etc.
Dashboard can be categorized as shown in the following snapshot. Each of these categories are discussed in the following sections −
Wordpress Dashboard

Dashboard Menu

The WordPress Dashboard provides navigation menu that contains some menu options such as posts, media library, pages, comments, appearance options, plugins, users, tools and settings on the left side.

Screen Options

The dashboard contains different types of widgets which can be shown or hidden on some screens. It contains check boxes to show or hide screen options and also allows us to customize sections on the admin screen.

Welcome

It includes the Customize Your Site button which allows customizing your WordPress theme. The center column provides some of the useful links such as creating a blog post, creating a page and view the front end of your website. Last column contains links to widgets, menus, settings related to comments and also a link to the First Steps With WordPress page in the WordPress codex.

Quick Draft

The Quick Draft is a mini post editor which allows writing, saving and publishing a post from admin dashboard. It includes the title for the draft, some notes about the draft and save it as a Draft.

WordPress News

The WordPress News widget displays the latest news such as latest software version, updates, alerts, news regarding the software etc. from the official WordPress blog.

Activity

The Activity widget includes latest comments on your blog, recent posts and recently published posts. It allows you to approve, disapprove, reply, edit, or delete a comment. It also allows you to move a comment to spam.

At a Glance

This section gives an overview of your blog's posts, number of published posts and pages, and number of comments. When you click on these links, you will be taken to the respective screen. It displays the current version of running WordPress along with the currently running theme on the site.

WordPress Install in Your PC

System Requirements for WordPress

  • Database − MySQL 5.0 +
  • Web Server −
    • WAMP (Windows)
    • LAMP (Linux)
    • XAMP (Multi-platform)
    • MAMP (Macintosh)
  • Operating System − Cross-platform
  • Browser Support − IE (Internet Explorer 8+), Firefox, Google chrome, Safari, Opera
  • PHP Compatibility − PHP 5.2+

Download WordPress

When you open the link https://wordpress.org/download/, you will get to see a screen as the following snapshot −
WordPress Installation

Create Store Database

  • WordPress requires MySQL database. So create a new empty database with user/password (for example, user as "root" and password as "root" or else you can set as per your convenience).
  • Then, you can continue with the installation process as discussed further.

Set Up Wizard

It's very easy to set up WordPress into your system. The following steps describe how to set up WordPress locally on your system.
Step (1) − Extract the downloaded WordPress folder and upload it into your web server or localhost.
Step (2) − Open your browser and navigate to your WordPress file path, then you will get the first screen of the WordPress installer as shown in the following screen. In our case, the path is localhost/< Your_wordpress_folder >.
WordPress Installation
Select your language for the WordPress and click on Continue.
Step (3) − In this step, you can view the information needed for the database before proceeding with WordPress installation.
WordPress Installation
Click on Let's go!
Step (4) − Here, you have to enter the information about the MySQL database as described in the following screen.
WordPress Installation
  • Database Name − Enter the database name which you have created in MySQL database for WordPress.
  • Username − Enter the user name of your MySQL database.
  • Password − Enter the password which you had set for MySQL database.
  • Database Host − Write the host name, by default it will be localhost.
  • Table Prefix − It is used to add prefix in the database tables which helps to run multiple sites on the same database. It takes the default value.
After filling all information, click on Submit button.
Step (5) − WordPress checks the database setting and gives you the confirmation screen as shown in the following snapshot.
WordPress Installation
Click on Run the install
Step (6) − Enter administrative information.
WordPress Installation
It contains the following fields −
  • Site Title − Enter the name of the site which you are going to create in WordPress.
  • Username − Enter the username as per your choice while logging in the WordPress.
  • Password twice − Enter password two times to protect your site.
  • Your E-mail − Enter your e-mail address which helps to recover the password or any update.
  • Privacy − It allows the search engine to index this site after checking the checkbox.
After filling all the information, click on the Install WordPress button.
Step (7) − After installation being successful, you will get a screen of the stating success as seen in the following screen.
WordPress Installation
You can view your username and password detail added in WordPress.
Click on Log In button.
Step (8) − After clicking on login, you will get a WordPress Admin Panel as depicted in the following screen.
WordPress Installation
Enter the username and password which you had mentioned during installation as shown in step 6 and click on the Log In button.